
Your First Experiment
Build and launch your first A/B test two ways — let Splitty create it with AI from your live page, or set it up yourself in the three-step wizard.
There are two ways to build your first test. Create with AI opens your live site with Splitty, the AI test builder, docked beside it — you answer a few questions (or type one message) and Splitty builds the variants, targeting and traffic split for you. The manual wizard walks you through the same setup yourself in three steps: General, Targeting and Variants. Both end in the same place: a draft you review and launch. Plan on about 15 minutes either way.
Before You Start
Pick something specific to test. Good first experiments are simple, single-element changes:
- Add-to-cart or signup button color, size, or label
- Headline copy or font weight
- Trust badges or social proof placement
- Hero image swap
Resist the urge to test multiple changes at once. If your variant changes three things and it wins, you’ll have no idea which change caused the lift.
Path 1: Create with AI
Start from the Dashboard or the Experiments page
On the Dashboard, the banner Build your next test with AI carries the Create with AI button. On Experiments, the Create Test button starts the same flow; its menu also offers Create Using AI and Create Manually (the wizard). If AI is switched off for your workspace, Create Test is a plain button that opens the wizard instead.
Meet Splitty on your page
A new tab opens your homepage in preview mode with Splitty docked beside it. Navigate to the page you want to test — preview mode follows you around your site. A draft named AI Draft Test — today’s date appears in your Experiments list right away, so nothing is lost if you close the tab.
Answer the questions, or just ask
Splitty opens with Use the chat or the questions to get started. Work through the question card (test name, goal, hypothesis, where it runs, activation, devices, audience, what to test, when to run) or type a single message describing what you want to improve. Anything you leave out takes a sensible default: this page, page load, all visitors, start now.
Build Test, review, launch
Pick one of the suggested ideas and click Build Test. Splitty creates the draft, configures the variants, sets targeting and traffic, and validates the setup. The Review your test card then lists every field — change anything inline, then click Launch Experiment and confirm.
The full tour of Splitty — attachments, chat edits after a build, history, the quick start and how generations are counted — is in Splitty, the AI Test Builder.
Path 2: The Manual Wizard
The wizard has three steps: General → Targeting → Variants. Each step has its own questions, and the Experiment Summary beside them updates as you type. Open it with Create Manually on the Experiments page.
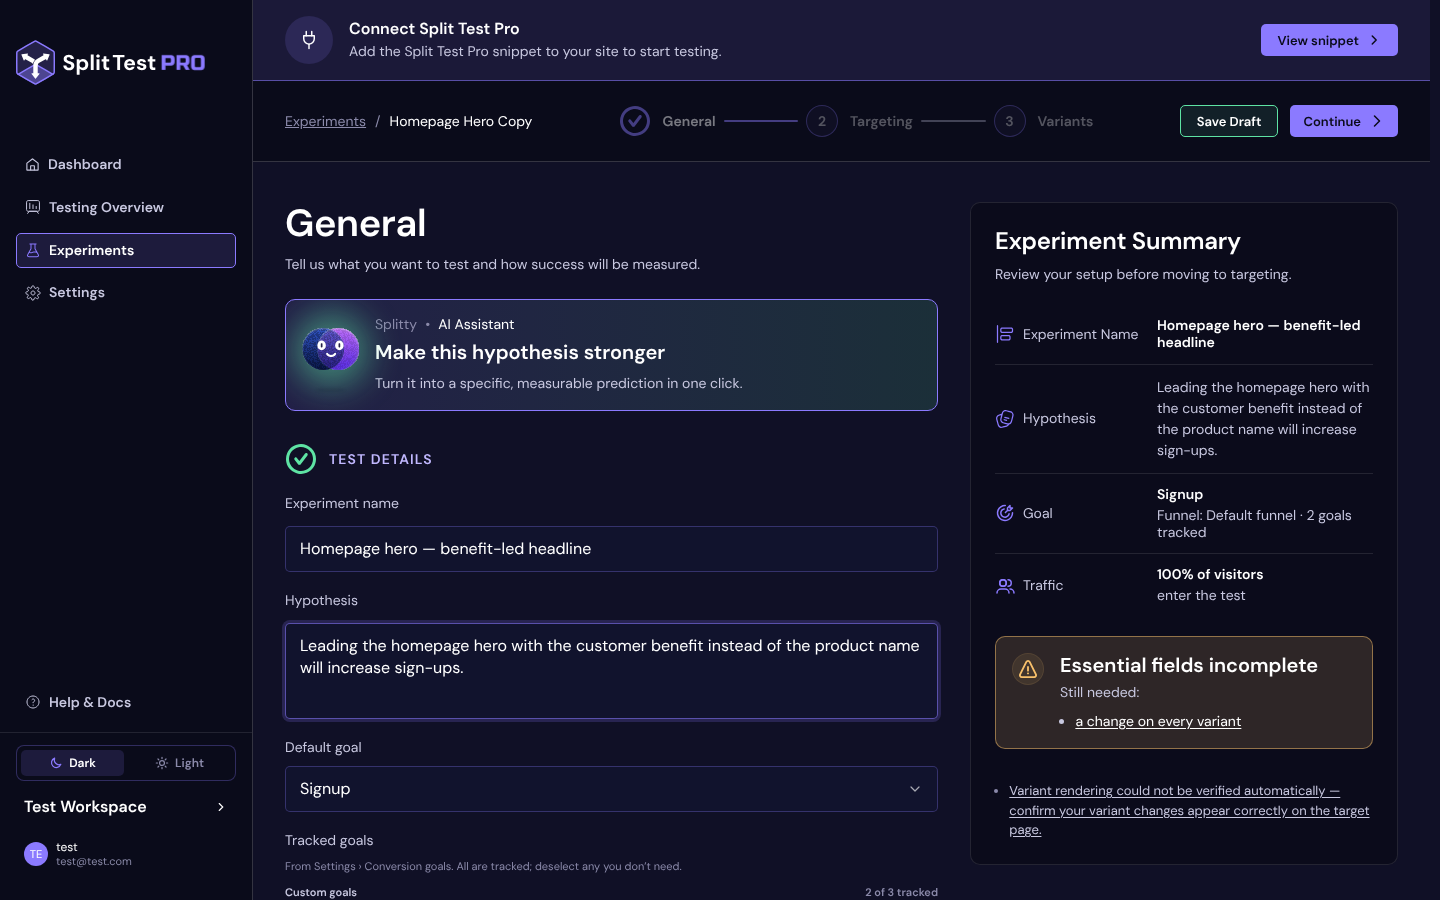
Step 1: General
Name it and write a hypothesis
Give the test a clear Experiment name like “Product page — orange CTA vs blue control”. Vague names (“Button test”) become useless once you have ten of them.
Add a Hypothesis. The format that works best is:
“We believe [change] will [increase/decrease] [metric] because [reason].”
Example: “We believe an orange CTA button will increase add-to-cart rate because it contrasts more strongly with our white theme than the current blue.”
Choose the goals
Open Default goal (“Choose a goal”) and pick the metric the test is judged on. On Shopify the built-in goals (add to cart, checkout, purchase and the like) are ready to use. On an HTML site the list comes from Settings › Conversion goals, so define at least one goal first — see Conversion Goals.
Tracked goals shows every goal as a chip. All of them are tracked by default; the default goal is always on, and you can deselect the ones you don’t need.
Activation and traffic
Activation is On page load for most tests. Choose Custom event only when the test should wait for something to happen first — you then name the event, and Delay and Sticky controls appear beside it. See Event Activation.
The Traffic allocation slider sets how much of your traffic enters the test (the default is 100%). You split that share between variants on the Variants step.
Step 2: Targeting
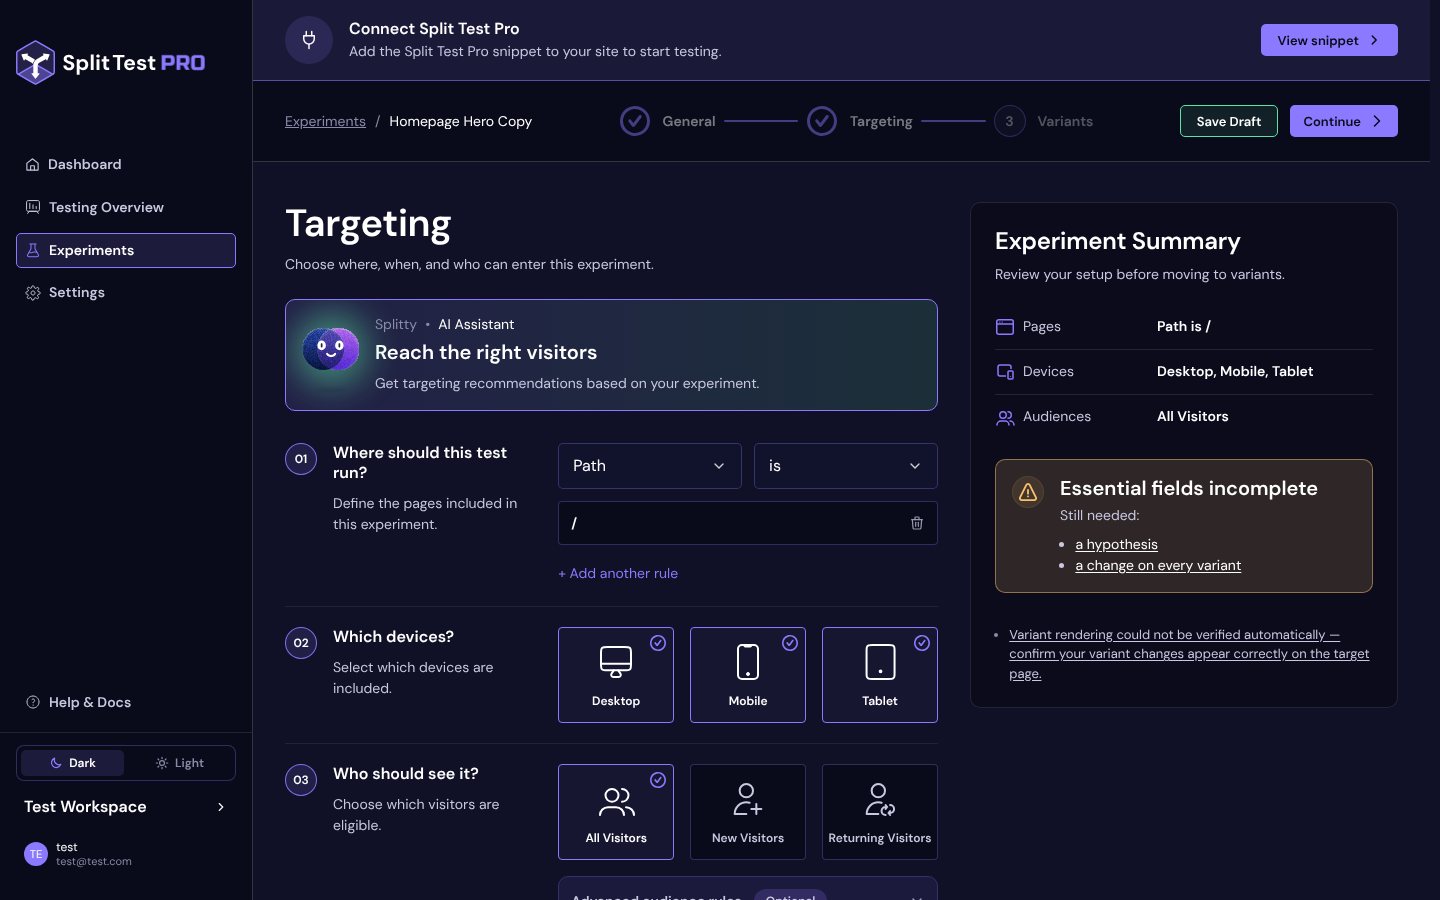
Targeting asks three questions: Where should this test run?, Which devices? and Who should see it?
Where should this test run?
Add a page rule. The simplest first-experiment setup is:
- Attribute: Path
- Operator: is
- Value:
/products/your-product-slug
This restricts the experiment to one product page. Broader rules (contains, starts with, several rules joined with and / or) can wait — see URL Targeting for the full set. Save the rule; the summary lists “a saved page rule” until you do.
Devices and audience
Which devices? — leave Desktop, Mobile and Tablet all selected for your first test (at least one is required).
Who should see it? — pick All Visitors, New Visitors or Returning Visitors. All Visitors is the right choice for a first test.
Step 3: Variants
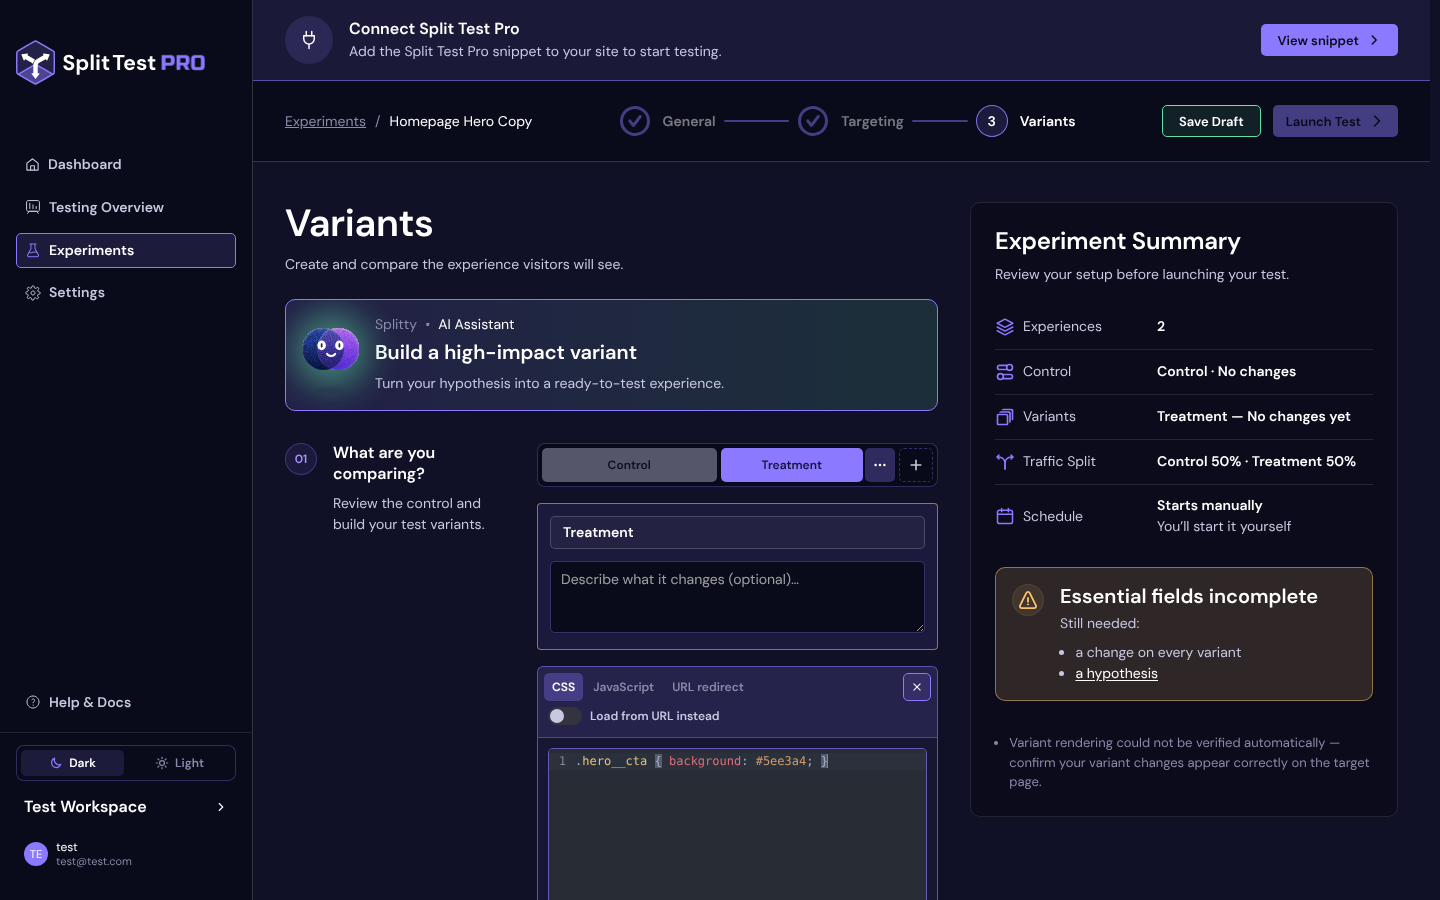
Section 01 What are you comparing? — Set up the control and one or more variants. — is a stacked list. At the top is the Control bar, your unchanged page, with its name, an Original pill, a colour dot (click it to give the control its own colour; Default restores the standard grey), a Preview button and a screenshots button. Below it is one card per variant; the first time you open this step a saved Variant A is there for you. The dashed Add variant button under the cards adds more. Each card’s header holds the variant’s name (click to rename), a Preview button, a ⋯ menu — Color, Preview link, Delete, Set as control, Duplicate — and a chevron that collapses the card. An experiment always keeps at least one variant, so the last one cannot be deleted.
Inside the card are the four test types: Code · CSS & JS, URL redirect, Theme test and Template test (the last two on Shopify only). Tick one to use it.
Write Variant A's CSS
On Variant A’s card, tick Code · CSS & JS. Its panel opens on the CSS tab. For an orange-CTA test, your variant CSS might look like:
.btn-primary,
form[action="/cart/add"] button[type="submit"] {
  background-color: #f5620a !important;
  border-color: #f5620a !important;
  color: #ffffff !important;
}
Use your browser’s DevTools to find the right selector — open the page, right-click the button you want to change, and copy a stable class or ID. See Selector Cookbook for patterns. Click Save on the card. The JavaScript tab and the other test types cover bigger changes — see Variant Types Overview — and Load from URL instead lets a variant pull its CSS or JavaScript from a file you host.
Set the Preview URL and check the screenshot
Paste the full address of the page you are targeting into Preview URL, under the Control bar, and save it. The app captures a screenshot of each variant on that page, shown in the card’s Preview strip, so you can see what visitors will see. Preview in the card’s header (and on the Control bar) opens the page with that experience applied and Splitty beside it; Preview link in the variant’s ⋯ menu gives you a link to send to a colleague, with Copy link and an Edit button that opens the same Splitty preview. See Screenshots and Preview.
Traffic split and timing
02 Traffic allocation — Set the percentage of total traffic for each experience. Each experience gets an equal share by default (50% / 50% for two). Leave it there for your first test, or click Split evenly to reset it. Uneven splits are for later, risk-managed rollouts (see Traffic Allocation).
03 Schedule — Choose when the test will start. Under When it runs, Manually launches the test as soon as you click Launch Test. Choose Schedule to pick a launch time and an optional end time instead.
Launch Checks
The Experiment Summary beside the steps is the launch gate. While anything essential is missing it reads Essential fields incomplete and lists what is Still needed — a name, a hypothesis, a default goal, a saved page rule, a test type on every variant with its settings filled in, and so on. Once everything is in place it switches to All essential fields complete.
- Save Draft at any time; the button reads Saved once the draft is stored. A draft keeps its place in the Experiments list until you launch it.
- Continue moves to the next step. It stays dimmed while the current step still has an essential field missing.
- Launch Test appears on the Variants step. The toast reads Launched, or Scheduled for a date and time when When it runs is set to Schedule.
A few checks run on the server when you launch — an active subscription, your monthly session limit, your plan’s cap on concurrent experiments, and a valid default goal. If one fails, the message shows in place above the steps, with a link to Billing or Settings where that is the fix.
Before you click, run through Launch Checks — the short manual review that catches the mistakes the summary cannot.
While you build, the Splitty banner at the top of each step offers Improve with AI: one click drafts or sharpens that step’s fields for one generation, and Undo puts your own values back for free. Once the test has data, the AI analysis on the Results page is covered in AI Review.
What Happens Next
Once the experiment is live:
- Visitors who match your targeting are assigned to a variant. By default the assignment is sticky by visitor, so they keep seeing the same variant on later visits.
- The experiment opens on its Results page, with the tabs Results | Setup | Activity | Alerts. Results fills in as sessions and conversions arrive; Setup shows the configuration you just built; Activity logs what changed and when; Alerts lists anything that needs a look.
Next Steps
- Learn how to read the results: Reading Your Results Dashboard.
- Understand what “probability to be best” actually means: Bayesian Stats Explained.
- Decide when it’s safe to call a winner: Declaring a Winner.
- Let Splitty build the next one: Splitty, the AI Test Builder.
- Launch it at a set time instead of right away: Scheduling.
